Save Facebook Photos 2019
By
MUFY UJASH
—
Jul 30, 2019
—
Saving Photos On Facebook
Facebook has placed a large focus on multimedia in the last few years, and it's where a lot of us share images as well as video online. The social media network is cost-free, basic, and also does not require us to invest any kind of additional time showing friends because that's exactly what it's produced. It's approximated that more than 300 million photos are posted every day, making it among the greatest on-line picture directories on earth.
Given this large quantity of images on Facebook, it's likely that you have actually published a picture or more in the past, specifically if you've used the solution for a significant amount of time or recognize individuals who could have included you in their very own images. Yet just how do you fetch said images from Facebook if your computer system collisions, or if you decide to deactivate your account and also take a break? Well, we have actually created this handy overview of assist you out.

Save Facebook Photos
Downloading a solitary picture using Facebook
Before we look into more advanced choices, it's worth noting that there is a simple method to download your pictures one-by-one, or an image from a friend or Facebook group that catches your eye. To do so, click the image in your timeline and choose Options in the menu bar that shows up when you mouse over the picture. Later, click Download and choose a conserve location for the resulting file. It's a pretty simple as well as fast way to download photos.

Naturally, this is not mosting likely to function well for the hundreds or countless images that you may have. For even more involved jobs, comply with these straightforward methods to get it done quickly with a minimal amount of job.
Downloading multiple images utilizing Facebook
Facebook makes it a snap to download and install all your precious pictures right from your account settings. Regretfully, the solution just permits you to download a duplicate of all your Facebook data-- photos, posts, good friends, the whole 9 lawns - and there is presently no choice to distinguish any particular sort of web content. It's still a fantastic method if you're aiming to bypass added software program, web browser extensions, and the like.
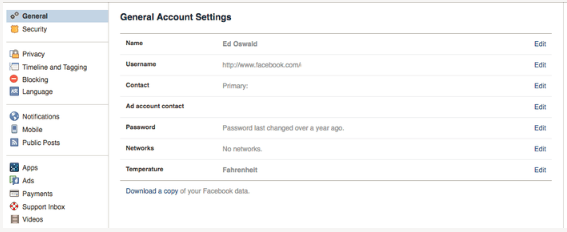
Step 1: Access your Account Settings and Verify Identity
Click the down arrow in the upper-right edge of your Facebook homepage - directly to the right of the padlock icon. From there, you'll wish to select Settings from the list of readily available alternatives. This need to take you to the General Account Settings tab in your account settings, which houses the alternative you'll need. Click Download a copy of your Facebook data as well as, on the next page, click the Start My Archive button.
Action 2: Begin the Archive Process.
When done, you'll be triggered to enter your password. Enter it as you would typically and also click the Submit switch. The resulting pop-up will notify you of what you will download, that includes your conversation history, photos, text messages, as well as a wide range of info that's far better laid out in Facebook's assistance web pages. As a matter of fact, anything labeled with "Downloaded info" under the Where can I discover it? column on claimed assistance web page will be consisted of in the archive. As you could envision, this will be a huge documents.
Action 3: Wait.
As soon as sent, a message will certainly show up on the download page saying, "We're generating your personal archive. We'll email you when it's ready" Now, simply wait while Facebook assembles your archive. You'll get an e-mail when your archive prepares, so you don't always should stay on the page while this happens - Facebook will certainly include a connect to the page within the email. The process could use up to a half hr to complete, nonetheless, especially if you've been on Facebook for a long time. Sit tight.
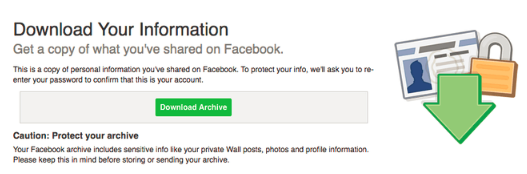
Tip 4: Download the archive.
You will certainly receive an e-mail from Facebook when your individual archive is ready to download. Click the accompanying web link, or accessibility the download web page once more from the General Account Settings Tab when you're ready to download the file. After that, re-renter your password and click the green Download Archive switch to download all your details as a ZIP data.
Step 5: Take a look at your photos!
Open the resulting data-- it must be titled after your name-- and click on the "index.htm" file. The good news is, Facebook organizes this in such a way that makes it easy to navigate utilizing your internet internet browser. Click Photos in the left-hand menu, and you'll see a listing of your photos, each separated by album. To browse your photos, just select an album!
Given this large quantity of images on Facebook, it's likely that you have actually published a picture or more in the past, specifically if you've used the solution for a significant amount of time or recognize individuals who could have included you in their very own images. Yet just how do you fetch said images from Facebook if your computer system collisions, or if you decide to deactivate your account and also take a break? Well, we have actually created this handy overview of assist you out.
Save Facebook Photos
Downloading a solitary picture using Facebook
Before we look into more advanced choices, it's worth noting that there is a simple method to download your pictures one-by-one, or an image from a friend or Facebook group that catches your eye. To do so, click the image in your timeline and choose Options in the menu bar that shows up when you mouse over the picture. Later, click Download and choose a conserve location for the resulting file. It's a pretty simple as well as fast way to download photos.
Naturally, this is not mosting likely to function well for the hundreds or countless images that you may have. For even more involved jobs, comply with these straightforward methods to get it done quickly with a minimal amount of job.
Downloading multiple images utilizing Facebook
Facebook makes it a snap to download and install all your precious pictures right from your account settings. Regretfully, the solution just permits you to download a duplicate of all your Facebook data-- photos, posts, good friends, the whole 9 lawns - and there is presently no choice to distinguish any particular sort of web content. It's still a fantastic method if you're aiming to bypass added software program, web browser extensions, and the like.
Step 1: Access your Account Settings and Verify Identity
Click the down arrow in the upper-right edge of your Facebook homepage - directly to the right of the padlock icon. From there, you'll wish to select Settings from the list of readily available alternatives. This need to take you to the General Account Settings tab in your account settings, which houses the alternative you'll need. Click Download a copy of your Facebook data as well as, on the next page, click the Start My Archive button.
Action 2: Begin the Archive Process.
When done, you'll be triggered to enter your password. Enter it as you would typically and also click the Submit switch. The resulting pop-up will notify you of what you will download, that includes your conversation history, photos, text messages, as well as a wide range of info that's far better laid out in Facebook's assistance web pages. As a matter of fact, anything labeled with "Downloaded info" under the Where can I discover it? column on claimed assistance web page will be consisted of in the archive. As you could envision, this will be a huge documents.
Action 3: Wait.
As soon as sent, a message will certainly show up on the download page saying, "We're generating your personal archive. We'll email you when it's ready" Now, simply wait while Facebook assembles your archive. You'll get an e-mail when your archive prepares, so you don't always should stay on the page while this happens - Facebook will certainly include a connect to the page within the email. The process could use up to a half hr to complete, nonetheless, especially if you've been on Facebook for a long time. Sit tight.
Tip 4: Download the archive.
You will certainly receive an e-mail from Facebook when your individual archive is ready to download. Click the accompanying web link, or accessibility the download web page once more from the General Account Settings Tab when you're ready to download the file. After that, re-renter your password and click the green Download Archive switch to download all your details as a ZIP data.
Step 5: Take a look at your photos!
Open the resulting data-- it must be titled after your name-- and click on the "index.htm" file. The good news is, Facebook organizes this in such a way that makes it easy to navigate utilizing your internet internet browser. Click Photos in the left-hand menu, and you'll see a listing of your photos, each separated by album. To browse your photos, just select an album!
